 If you are getting this error when connecting your EQ6-R Pro to EQMOD: “Connect Error: Port not available“, then this article is for you.
Likely you’ve reached the end of your tether, trying to get your mount to work with ASCOM and EQMOD HE5/6. I hope this procedure helps you get your mount working!
The Use Case is as follows: Connect serial cable to hand controller to connect to the PC. Simple as that. A standard USB connection. Shouldn’t be a big deal, but from the pages I’ve seen out there and posts on forums, it CAN BE a huge issue for many.
Results of my attempts: Two days of pure frustration. Doubts that ASCOM actually works. Ready to chuck the entire mess aside and go straight to USB without ASCOM. In reality, the problems were not ASCOM but a complete lack of any coherent recipe to help a newbie like me get the mount running as intended.
To give you an idea of my software experience, I wrote a complete document management system that ran multiple aerospace development programs by myself and worked for 32 years in IT as a corporate webmaster. Despite all my experience, I was completely mystified by what I was experiencing trying to get this hardware and software to communicate on a common USB connection.
It is easy to blame software for something that isn’t working right and to be honest, what I saw in terms of the documentation for ASCOM-related packages was a Hodge-podge of frustrated posts by real people trying to get their equipment to work. And the documentation that did exist is confusing at best.
So, this article aims to help and explains things in plain English for what worked for me. I hope it helps you. Simplicity and POE (plain old English) get the job done.
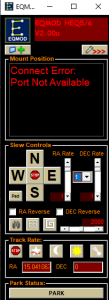 No matter what I did, when I attempted to connect EQMOD to the mount, all that EQMOD HEQ5/6 reported was the following error:
“Connect Error: Port not available” (See image to the left).
No matter what I tried, I was being denied the prize despite having done everything right.
To be blunt, after two days, I was approaching a point where I was ready to ditch ASCOM. I decided to make one last push to reach the objective.
Well – I finally made it work. And, as suspected, there were indeed mystical incantations, hidden knowledge and initiations to be endured and no end of cursing sessions until I chanced on a post on a forum. But… that can wait until the very end. I am going to give you the much hidden recipe that made this work for me. After all, it is likely why you are here!
READ TO THE VERY END OF THIS ARTICLE FOR THE SECRET OF WHY YOUR CONNECTION ISN’T WORKING!
First off, the basic recipe follows for the software installation.
Integrating a Skywatcher EQ6-R Pro to ASCOM
Cables
- A 6 to 10 foot USB type A to type B cable to allow for communication from the PC to the handset.
Software
- Download and install “Windows Driver: Prolific USB-to-Serial Device Driver” – I went with what Skywatcher recommends for communicating with the handset. I am aware newer versions of the mount have the USB connection direct to the mount itself. Mine is a 2019 model and connects to the handset. Note that if you have the Prolific driver installed already on your PC, you will need to change the driver to use the newly installed version Skywatcher distributes.
- Download and install latest ASCOM software.
- Download and install EQASCOM.
- RUNNING AS ADMIN (NO EXCEPTIONS), execute the “EQASCOM Toolbox” software. Register the eqmod.exe with the “Register” button. A “Success” box will display once this occurs.
- Click “Driver Setup” and configure the port setting and baud rate. I used defaults of 9600 baud, but some folks (as in the video below) recommend 115200 baud. I am not sure what is “recommended” but I do know mine works at 9600 for my older 2019 EQ6 mount. Your mileage may vary. I tried 115200 baud and it didn’t work for me. 9600 baud does. Could be the newer 2020 vintage and forward mounts may indeed use 115200, but mine likes 9600 and I’m keeping it there.
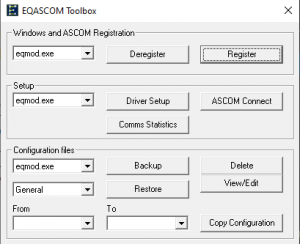
The EQASCOM Toolbox menu display
The following video does a better job than I can in describing the software connectivity to the mount for step 5 and beyond. Although this is a “No Hand Controller” video, it turns out that some of us with EQ6-R Pros need to use the hand controller to connect the serial port (there are other methods, but I am going with what is easiest and most common and what the average person will run into in their implementation). So take this into account when watching the video
The Secret Sauce
This video is excellent but it leaves out one tiny secret. The reason WHY your mount is not connecting to the EQMOD software is because you MUST tell the mount to accept connections to the serial port!
PC Direct Mode
Quoting the SynScan Guide:
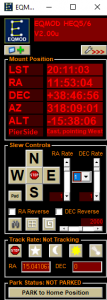
Once PC Mode is engaged, the software will connect!
PC Direct Mode is a special mode for the SynScan hand controller to work with a PC. Under this mode, the hand controller becomes a repeater between the PC and the motor controller inside the telescope mount. The application running on the PC controls the motor controller directly. Currently, the PC direct mode is mainly used to update the motor controller’s firmware.
- Access the menu “UTILITY FUNCTION \ PC Direct Mode” and press the ENTER key. The screen will display “PC Direct Mode \ Press ESC to exit.”
- Press and hold the ESC key for more than 1 second to exit PC Direct Mode. You can still use the direction keys to move the telescope mount.
Now you can connect the mount to the software and if you have done everything else correctly, you will see the connection take place!
This part of the process was universally missing from all of the help text and videos I was looking at!
Now you can shut down the EQASCOM Toolbox and connect with Stellarium or similar program to control your Skywater EQ6-R telescope mount.
Once this is all configured, then you won’t be needing to run the Toolbox again as a norm. You WILL need to add the necessary settings for ASCOM and EQMOD in your software package. In my case, I’m currently using Stellarium. Here is how that is done in Stellarium: